Facebook, as a company, has repeatedly violated their users’ trust and engaged in unethical, hostile behaviors towards user privacy and data custody.
A small subset of examples include:
– The Cambridge Analytica scandal
– Facebook failing to properly enforce safeguards for 3rd party apps, which led to massive data mining & theft of user information by third parties
– The Facebook Mobile app recording audio without users’ consent
– Facebook hiding privacy controls, setting poor defaults, and making the options difficult to use
– Facebook falsely inflating video viewership stats, which prompted a massive increase in video ad spending on the platform
– Facebook aggressively employing underhanded tactics that attempt to force users into using their privacy invasive mobile “Messenger” app in order to communicate with others on the platform
If you’re considering disassociating yourself from all-things-Facebook due to the above reasons, and others, then read on!
#DeleteFacebook Step 1: Download your Facebook data
The first thing you’ll want to do is download a copy of your Facebook data, which includes your posts and media (photos and videos).
On the Your Facebook Information page (access from a desktop), you’ll see a link to a Download Your Information page.
If you’re looking for this page from the Facebook desktop browser experience, you can click on the little down arrow on the top blue bar at the very right, click Settings from the drop-down menu, then click “Your Facebook Information” from the left hand column menu, and finally, click “Download Your Information”.
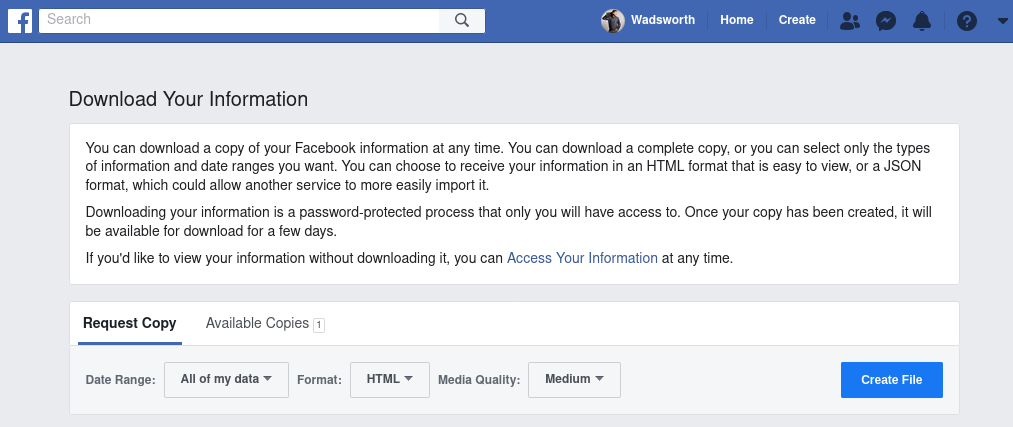
On this page, you can click the “Create File” blue button on the right hand side to start the process of exporting all of your data. Pay attention to all of the options here. I suggest updating “Media Quality” to “High” to get the best quality photos and videos from your export.
Once this process has started, Facebook will begin the process of exporting and bundling your data into a downloadable zip file. Once the file is ready, they will notify you via email. This can take minutes, hours, or days, depending upon the amount of data you have on the platform.
#DeleteFacebook Step 2: Notify your friends that you’re leaving the platform
We’ve all probably experienced a Facebook friend that disappeared abruptly, or the friend that creates new Facebook accounts on a routine basis.
To help brace your network for your #DeleteFacebook exit, you should provide notification. Come up with a schedule and stick to it. Perhaps you’ll post a one time warning and then be done with it. Others might want to post a few times over a period of a week, or a month, to let friends and family know that they’ll be disappearing from the anti-privacy Facebook platform.

#DeleteFacebook Step 3 (optional): Change your Name
Facebook is supposed to delete your account and all of your data when you use the “Permanently Delete Account” option, but due to the company’s multitude of user and data privacy violations in the past, it might be best to update your Name before deleting your account.
You may also want to change your Username on the settings page, especially if it has your real name in it. The Username is used to create your profile URL.
#DeleteFacebook Step 4: Permanently Delete Your Account
When you’re ready to enter the nuclear launch (deletion) codes, head on over to the Deactivate Delete Account page.
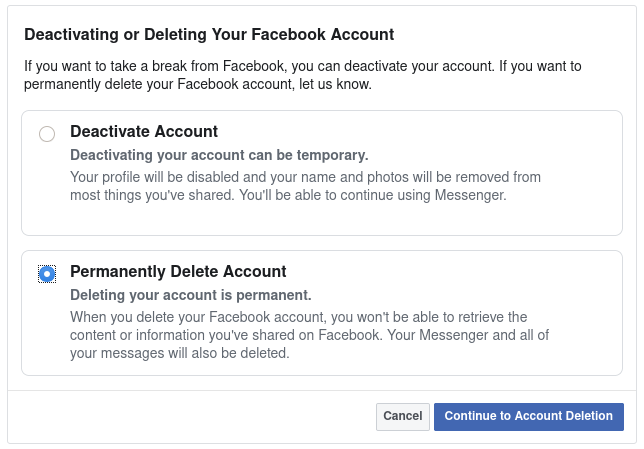
Select the radio button for the bottom option “Permanently Delete Account”, then click the blue button for “Continue to Account Deletion”.
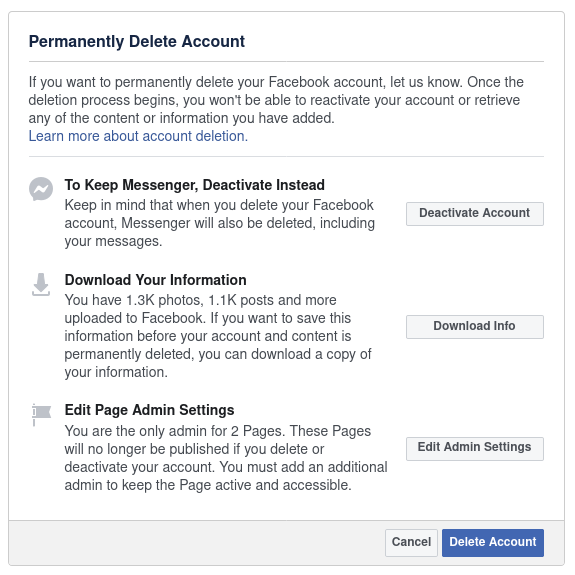
On this “Permanently Delete Account” page, Facebook warns you that deleting your account also eradicates your “Messenger” messages, reminds you that you can Download Your Information before deleting it all, and it warns you that if you are the only Admin for a Facebook Page or Pages, that those Pages will “no longer be published”. If you want any of your Facebook pages to remain active that you are the sole admin on, make sure to designate another admin for those pages before deleting your account.
Click that blue “Delete Account” button and revel in the satisfaction that you are escaping these privacy-invasive devils! You’ll then see a “Confirm Permanent Account Deletion” pop-up, as shown below.
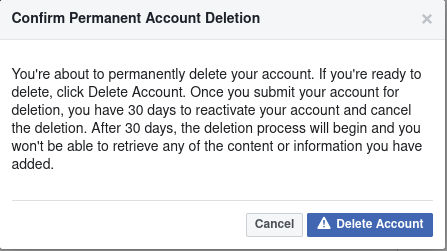
After clicking “Delete Account”, you’ll be logged out and you’ll see the informational box shown below.

#DeleteFacebook Step 5: wait 30 days
After waiting 30 days, your account and data will be permanently deleted! ( supposedly! )
#DeleteFacebook also includes Instagram and WhatsApp
Facebook owns Instagram and WhatsApp, and they’re in the process of unifying their privacy-invasive messaging platform across all of their products. This means that you should not only #DeleteFacebook but also #DeleteInstagram and #DeleteWhatsApp
Alternatives to Faceook
I plan to continue being active on Twitter and LinkedIn, but there are many other alternatives to the Facebook conglomerate. I also intend to post more on this site, which will help contribute to a more healthy, decentralized web.
If you’re looking for decentralized social networks, have a look at Mastodon and Diaspora.
Have you participated in the #DeleteFacebook movement? If so, how did it go for you? Leave us a comment to share your experiences.